Monday, March 31, 2014

THB : Holiday Cranberry-Nut Bourbon Cake

For this week's bake at The Home Bakers (THB), this cake, Holiday Cranberry-Nut Bourbon Cake is selected by Diana of The Domestic Goddess Wannabe. I like the name of this recipe, it sounds so festive with the cranberries and bourbon! Reminds me of Christmas!


OK! I know what you must be thinking, but NO, these are NOT doughtnuts!


 It does look like a doughnut! I do agree! Hahaha!

I made half a recipe and used two small ring tube pans, plain all around, with no patterns or corners. And the resulted small cakes actually look like doughnuts from the top, especially with the sprinkling of powdered sugar!


Bourbon, or you may use any whisky.

I've made a couple of minor changes to the recipe. As usual, I've reduced the sugar, and used only 1/3 cup for half a recipe. To replace the buttermilk, I've used a mixture of homemade yoghurt with some milk. And I have used only 1/4 cup of frozen cranberries as cranberries are usually very sour. Made up the balance of the cranberries with more golden raisins. And I have omitted the nuts as my family is not really fond of nuts in cakes, though I do sometimes add some nuts in bakes. But sometimes I omitted the nuts, like this time, to be fair, sometimes "now you see it", sometimes "now you don't"! 


When the cake is baked and fresh out of the oven, hot and still in the baking pan, pour over the hot cake, a mixture of orange juice and bourbon. I used a wooden skewer to poke thru the cake all over before the mixture is poured over. Let the cake sit in the pan for about 15 minutes, then unmold and cool on a wire rack. The cake is very moist, with almost dense-like crumbs, but with a soft texture. The golden raisins and the cranberries makes a nice pairing, as one is sweet and the other is sour, so it balances off nicely.

For the full recipe and instructions, please visit the host of this bake, Diana of The Domestic Goddess WannabeTo view other members' bake, please visit The Home Bakers (THB).

Welcome to The Home Bakers


We are a group of home bakers who are currently baking from "Coffee Cakes" by Lou Seibert Pappas, until each recipe from this book has been baked. This is our bake no. 33 and we have 27 recipes more to go. If you are interested to be a member and join in our bakes, you may drop me an email at kitchenflavours@yahoo.com.


Friday, March 28, 2014

Pain de Mie (French Sandwich Bread)

I bought my pullman bread pan many years ago, like 5 or 6, maybe 7 years ago, no idea exactly when, but it was a long time ago! It has not been sitting idle in my pantry cupboard, I have used it before for baking other breads, but have not made any pullman bread, as it was meant to be used for! Finally, a few weeks ago, I decided to try a Pullman Bread recipe from one of my favourite baking book, Nick Malgieri's, "Bread".


The bread dough is mixed as usual as per the instructions in the recipe below. As for the shaping of the dough before the final rising, I have made some changes, which can be found, noted in blue, from the instructions (at no. 8) in the recipe. Simply because the first time when I've made this bread by following the instructions in the shaping, the shape of my bread turned out funny! With some spaces and bumps on the surface, not a pretty sight! Obviously I need to practice more on the shaping. So on my second attempt,  instead of following Nick Malgieri's way of shaping the dough, I have adjusted to my simple way of shaping it, which works fine for me. 


Once I have shaped the dough, it is placed in the Pullman pan for the final rising, with the lid on, but only two-thirds of the way in. When the dough has risen to about 1/2" below the level of the pan, slide the lid to close the pan completely and proceed to bake as per the instructions below.


Baked out great. Perfectly flat at the top with  nice light golden colour.


The sides are a little pale in colour, I actually removed the bread from the pan and placed it on a baking tray, and bake for about 5 more minutes, but it makes no difference to the colour. I'm afraid of drying out the bread if baked it longer, so I took it out from the oven and left it to cool on a wire rack.


I guess the colour does not really matter!


The texture inside is moist, soft and fluffy. 


See how soft the bread is. It is a keeper recipe!
I have made this bread a couple of times. And it makes a lovely sandwich bread. Another plus is, it stays as soft on the third day! Be sure to wrap it in plastic wrap and placed in an airtight container.


Pain de Mie (French Sandwich Bread)
(adapted from "Bread", Nick Malgieri)
Makes one 9-inch long loaf
3/4 cup plus 2 tablespoons/200gm whole milk, scalded and cooled
1/2 cup minus 1 tablespoon/100gm room-temperature tap water, about 75F
2-1/4 teaspoons/7gm fine granulated active dry or instant yeast
1 tablespoon/14gm sugar
3-1/2 cups/470gm unbleached bread flour
   (spoon into a dry-measure cup and level off)
2-1/2 tbsps/40gm unsalted butter, softened
1-1/2 tsp/9gm fine sea salt (1 tsp)
One 9x4x4-inch covered Pullman pan or one 9x5x3-inch loaf pan,
   brushed with soft butter and sprayed with vegetable cooking spray

  1. Whisk the water and yeast together in the bowl of an electric mixer, then whisk in the cooled milk and sugar.
  2. Use a large rubber spatula to stir the flour into the liquid. Scrape the side of the bowl and continue mixing until no dry flour remains visible. Distribute the butter in 8 or 10 pieces on the dough.
  3. Place the bowl on the mixer with the dough hook and beat on the lowest speed for 2 minutes. Stop the mixer and let the dough rest for 15 minutes.
  4. Sprinkle in the salt and beat the dough on medium speed until it is smooth and elastic, about 5 minutes.
  5. Scrape the dough into an oiled bowl, turn it over so that the top is oiled, and let the dough ferment until it is almost doubled in bulk, about 45 minutes.
  6. Scrape the dough onto a floured surface. Flatten the dough to a disk. Fold the two sides in to overlap at the middle, then roll the top toward you all the way to the end, jelly-roll style. Invert, flatten, and repeat. Return the dough to the bowl smooth (bottom) side upward, and let it rise until fully doubled, 30 to 45 minutes longer, depending on the room temperature.
  7. Invert the dough to a floured work surface and divide it in half. One piece at a time, pull the dough to a rough rectangle and tightly roll if from the farthest long end toward you, jellyroll style, pinching the end of the dough to seal. Leave the pieces of dough on the work surface seam side up and cover loosely with a cloth or oiled plastic wrap; let rest for 20 minutes. (my changes : did not do this step, refer to the my step at no 8)
  8. To form the loaf, place both pieces of dough 1/4 inch away from each other on a floured work surface. Grasping one of the short ends with each hand, twist the dough in opposite directions to make an interlocked spiral. (Instead of dividing the dough into two, I pulled the whole piece of dough into one rough rectangle, roughly the length of the pullman pan, and roll it jelly-roll style, tightly. Then I hold the two ends together and twist three times along the length of the dough, proceed as per step 9).
  9. Slide both hands, palms upward, under the twisted dough and invert it, seam side down, into the prepared pan. Slide the cover about 2/3 of the way across the top of the pan. Let the loaf proof until it is about 1 inch away from the top of the pan.
  10. Set a rack in the lower third of the oven and preheat to 400F.
  11. Once the dough has risen so that it is only 1/2 inch away from the top of the pan, slide the cover closed and place the pan in the oven. Decrease the temperature to 375F and bake for 25 minutes.
  12. Without removing the pan from the oven, use oven mitts to slide the cover off the pan. Continue baking until the internal temperature of the dough is over 200F, 10 to 15 minutes longer.
  13. Remove the loaf from the oven and unmold it onto a rack to cool. Wrap in plastic and keep at room temperature if using the same day, or double wrap and freeze for longer storage.

I'm sharing this post with :

Wednesday, March 26, 2014

Crispy Sage Potatoes with Fried Eggs : IHCC - Catch Ya Later Donna Hay

"Catch Ya Later Donna Hay", our theme for this week at I Heart Cooking Clubs (IHCC). This is the final week that we'll be cooking with Donna Hay, and will be starting with our next featured chef, Nigel Slater in April. But not to fret, there's Potluck week each month, and we are free to cook with any of our previous featured chefs' recipes, so I'll be seeing Donna Hay again.


I made this Crispy Sage Potatoes with Fried Eggs for myself for brunch. This is really easy, and quick to make, a perfect meal for one. Recipe uses Sebago potatoes, but I have used 2 medium Russet, since that was what I had. The potatoes are peeled and cut to small cubes, pan-fried in a little oil until half cooked with some coarse chilli flakes, salt and pepper, then the sage leaves are added in, cook for a few minutes more until the potatoes are tender and golden. The potatoes are then pushed to the sides, creating a space in the middle, break an egg into it, and cook until the egg is set and yolk still runny. Serve! See, how simple it is!


A perfect meal for one!  Since I skipped my breakfast, I had this for brunch with a mug of warm tea.  Satisfaction!


I like my yolks runny! Cook it a little longer if you like the eggs to be fully set.


Crispy Sage Potatoes with Fried Eggs
(source from : donnahay.com)
2 tbsp olive oil
400gm Sebago (starchy) potatoes, peeled and chopped
1/2 tsp dried chilli flakes
sea salt and cracked black pepper
8 sage leaves
2 eggs
Worcestershire sauce, to serve

Heat the oil in a large non-stick frying pan over medium heat. Add the potatoes, chilli, salt and pepper and cook for 4-5 minutes. Add the sage and cook for a further 4-5 minutes or until potatoes are tender and golden. Move the potatoes to the sides and crack the eggs into the middle. Cook for 3-4 minutes or until the eggs are just set. Drizzle with Worcestershire sauce to serve. Serves 2.


This post is linked to I Heart Cooking Clubs (IHCC), for this week's theme "Catch Ya Later Donna Hay". We will be cooking with a new featured chef, Nigel Slater, starting next week. If you are interested to join us, do find out more details at IHCC, here.


Roundup of Donna Hay's recipes which I've cooked for the past 6 months with IHCC


***************************

I'm linking this post to Cook Like A Star, All-Stars Anniversary Party, hosted by Zoe of Bake For Happy KidsMich of Piece of Cake and Joyce of Kitchen Flavours.
(click on any of the hostess blog for further info and to link your posts)

All-Stars Anniversary Party featured chefs :  Ina Garten, Jamie Oliver, Nigella Lawson, Curtis Stone, Ree Drummond, Bill Granger, Masterchefs, Martha Stewart, Delia Smith, Donna Hay


Monday, March 24, 2014

Sticky Chicken Drumsticks

Just as the name of the recipe, these Sticky Chicken Drumsticks are sticky!  A recipe from Curtis Stone.


Sticky and yummy, fingers licking good.


Very easy to prepare. Mix the ingredients for the marinade in a bowl, soy sauce, Chinese barbecue sauce, honey, chopped garlic and chopped ginger. Add the chicken drumsticks, turn to coat, and leave to marinade in the fridge for at least an hour. I marinated the drumsticks for two hours.


Line a baking sheet with foil. Arrange the drumsticks and pour all of the marinade onto the baking sheet. Though the recipe requires the drumsticks to be broiled for about 25 minutes, I have baked them at 200C for 25 minutes, turn them over and bake for a further 20-25 minutes until they are cooked and have turned a dark caramel colour. You may broil them according to the recipe.


Served with some greens, and a glass of cold drink, makes a very nice lunch.


You would be licking your sticky fingers clean! Kids would definitely enjoy eating these drumsticks!


Sticky Chicken Drumsticks
(adapted from "Relaxed Cooking With Curtis Stone", Curtis Stone)
Serves 4 to 6
1/4 cup soy sauce
1/4 cup Chinese barbecue sauce (char sui)
1/4 cup honey
3 garlic cloves, finely chopped
1 tablespoon finely chopped peeled fresh ginger
12 chicken drumsticks
2 teaspoons sesame seeds, toasted

Mix the soy sauce, barbecue sauce, honey, garlic and ginger in a resealable storage bag to blend. Add the chicken, seal the bag, and toss to coat with the sauce. Refrigerate for at least 1 hour but preferably overnight.

Position on oven rack 8 to 10 inches from the heat source and preheat the broiler. Line a large, rimmed baking sheet with heavy-duty foil. Transfer the drumsticks and marinade to the prepared baking sheet and broil, turning the durmsticks occasionally and watching them closely, for 25 minutes, or until the chicken is cooked through and the marinade has glazed it. Sprinkle the sesame seeds over the chicken, and serve.


***************************

I'm linking this post to Cook Like A Star, All-Stars Anniversary Party, hosted by Zoe of Bake For Happy KidsMich of Piece of Cake and Joyce of Kitchen Flavours.
(click on any of the hostess blog for further info and to link your posts)

All-Stars Anniversary Party featured chefs :  Ina Garten, Jamie Oliver, Nigella Lawson, Curtis Stone, Ree Drummond, Bill Granger, Masterchefs, Martha Stewart, Delia Smith, Donna Hay


Saturday, March 22, 2014

Ham And Cheese Pastry Puffs

Made these Ham and Cheese Pastry Puffs for our weekend tea-time snack. This is actually just a regular Ham and Cheese Pastry Puffs, but the special addition of the Spice Blend makes it a little different and interesting. 


The Spice Blend : onion powder, chilli powder, dried thyme, coarsely ground black pepper, ground allspice, ground cloves, ground cinnamon, garlic power. It smells spicy sweet! This recipe makes quite a lot, keep the balance in an airtight jar and use it for future batch or for other uses.


How it is made :
1. Place a piece of ham across the pastry. I have used two layers of ham.
2. Place a piece of Cheddar cheese over the ham pieces.
3. Sprinkle some Spice Blend over.
4. Fold the opposite two corners overlapping in the centre, pressed edges to seal.


Place pastry on baking sheet, brush with egg wash all over and sprinkle with more Spice Blend. Bake at 200C for 12-14 minutes, mine took about 15 minutes.


Freshly baked Ham and Cheese Pastry Puffs


Puffy and crispy


The Spice Blend makes a very interesting flavour to these pastry puffs. There's a slight hint of spiciness, yet wonderfully flavoured from all the spices. A delicious snack for a weekend tea-time treat with a mug of warm tea.


Ham and Cheese Pastry Puffs
(adapted from "The Back In The Day Bakery Cookbook", Cheryl and Griffith Day)
For the Spice Blend :
1/2 teaspoon onion powder
1 tablespoon chilli powder
1 teaspoon dried thyme
2 teaspoon coarsely ground black pepper
1 teaspoon ground allspice
1/2 teaspoon ground cloves
1 teaspoon ground cinnamon
1/4 teaspoon garlic powder
fine sea salt to taste (omit this)

For the Pastries :
One 17.3-ounce package frozen puff pastry (2 sheets), defrosted for 20 to 30 minutes in the refrigerator
1/2 pound thinly sliced Black Forest ham
1/2 pound sharp white cheddar cheese, thinly sliced
1 egg, beaten with 1 tablespoon water, for egg wash
1 teaspoon fine sea salt (omit this)

Position a rack in the lower third of the oven and preheat the oven to 400F. Line a baking sheet with parchment.

To make the spice blend : Combine all the ingredients in a small bowl and mix well.

To make the pastries : Unfold the pastry sheets on a lightly floured surface. Cut each pastry sheet into 4 (about 5-inch) squares.

Arrange the sliced ham and cheese on the centers of the pastry squares, dividing them evenly. Sprinkle some of the spice blend lightly over each one. Fold two opposite corners of each square over the filling to make a pouch and press the edges to seal; transfer the pastries to the prepared baking sheet.

Brush each pastry evenly with the egg wash. Sprinkle the tops with more spice blend to taste. Sprinkle salt evenly over the pastries.

Bake for 12 to 14 minutes, until the pastries are golden brown. Remove the pastries from the baking sheet and let cool on a wire rack for 10 minutes. Serve warm or at room temperature.
#93/100

I'm sharing this post with :

 photo 77951578-1914-4b72-8eda-9e40a91183ac_zps331eb4b4.jpg

And I'm sharing this post with :
See Ya In The Gumbo @ Ms. enPlace


Thursday, March 20, 2014

Marbled Chocolate Crumble Cake : Bake Along #59

Time for Bake-Along! For our Bake-Along #59, Lena has selected the theme "Marbled Butter Cake". Marble Cake is really an all-time favourite, I love biting into the two different flavours in one cake, and seeing the pretty swirls in the cake. And for every marble cake that is baked, you would never get the same swirls! One of my earliest memories of eating marble cakes, was the one that my mother used to bake, when we were young. Marble cakes are really special and different when compared to other cakes at that time, maybe because we were not exposed to many other varieties and the many different types of cakes which are available now. I still think that marble cakes are special, old-fashion, yet never "out-of-fashion" !


I've chose to bake this lovely cake from Rachel Allen's "Cake" cookbook. What drawn me to this cake is the crumble topping on top of a moist buttery marbled cake. Usually when I make a marble cake, it would always be plain without any glazing, and this recipe of Rachel Allen's with a crumble topping sounds like fun!

The recipe is really straightforward. The crumble topping is first mixed and kept aside, to be used later to scatter on top of the batter before baking. I've made half a recipe and baked in a 7" round springform pan. I love how the cake rises really well. It looks like a small, elegant and proud cake, with the crumble as its crowning glory, at least to me, anyway! :o)


This is such a delightful cake to eat! The texture is moist, soft and tender. And the crumble topping, with the addition of chocolate chips in the crumble, makes it all the more chocolaty delicious.


This is the kind of cake that is perfect with a cup of either hot coffee or tea.  I love marble cakes, do you?


* my measurement for half a recipe, noted in blue
Marbled Chocolate Crumble Cake
(adapted from "Cake", Rachel Allen)
225gm (8oz) butter, softened, plus extra for greasing (110gm)
225gm (8oz) caster sugar (80gm)
4 eggs (2)
1 tsp vanilla extract (1/2 tsp)
225gm (8oz) plain flour (110gm)
2 tsp baking powder (1 tsp)
50ml (2fl oz) milk (2 tbsp, and 1/2 tsp for the cocoa batter)
25gm (1oz) cocoa powder (12gm)
icing sugar, for dusting

For the crumble topping :
125gm (4-1/2 oz) plain flour, sifted (60gm)
75gm (3oz) caster sugar (25gm)
75gm (3oz) unsalted butter, chilled and cut into cubes (35gm)
75gm (3oz) dark or milk chocolate, in chips or roughly chopped into pieces (50gm)

23cm (9in) diameter spring-form or loose-bottomed cake tin with 6cm (2-1/2in) sides

First make the crumble topping. Using your fingertips, rub together the flour, sugar and butter in a large bowl until it resembles thick breadcrumbs, then mix in the chocolate pieces. Set aside in the fridge while you make the sponge.

Preheat the oven to 180C (350F), Gas Mark 4, and butter the sides and the base of the cake tin. If you're using a spring-form tin, make sure the base is upside down so there's no lip and the cake can slide off easily when cooked. Cream the butter until soft in a large bowl or in an electric food mixer. Add the sugar and beat until the mixture is light and fluffy.

Whisk the eggs and vanilla extract together in a small bowl for a few seconds or just until combined, then gradually add the eggs to the creamed butter and sugar mixture, beating all the time. Sift in the flour and baking powder and fold in carefully, then add the milk and mix gently to combine. Tip half of the cake mixture into another large bowl, then sift the cocoa powder into this bowl and fold it in. (I've added in 1/2 tsp of milk to the cocoa batter for half a recipe).

Place the two different cake mixtures in the prepared tin by alternating heaped tablespoonfuls of the vanilla batter with the chocolate one, then, with a skewer or similar implement, gently draw swirls through the cake mixture to "marbleise" it. Try not to over-mix or you won't get that wonderful marbled effect.

Scatter the crumble mixture evenly over the top of the cake mixture and bake for 50-60 minutes or until the crumble is golden and a skewer inserted into the centre of the cake comes out clean.

Remove from the oven and allow to cool in the tin for 10 minutes, then loosen around the edges using a small, sharp knife and remove the sides of the tin. Place the cake (sitting on the base of the tin) on a wire rack and allow to cool completely.

Use a palette knife or metal fish slice to loosen the bottom of the cake from the base of the tin, then slide the palette knife or fish slice under the cake and carefully ease it onto a plate. Dust with icing sugar to serve.

****************

To join our blog hop, bake any Marbled Butter Cake of your choice, and link your post to our Bake-Along linky.
Please visit my baking buddies, Lena from Frozen Wings and Zoe from Bake For Happy Kids, and all our friends who has baked along with us in the linky below :

Bake-Along will be taking a break in April and we shall be back in May. One exciting news, Bake-Along is celebrating it's 3rd Anniversary in May, and we shall be having a special theme, Theme : Chocolate Cakes. Join us as we celebrate our 3rd year of baking together, bake any Chocolate Cake of your choice and link up with us. Our blog-hop linky will start on 05/05 to 14/05. Everyone is welcome!


Photobucket


A friendly reminder when linking to our blog hop :
1. Please mention Bake-Along event in your own post linking direct to any of the hosts' post (JoyceLena or Zoe)
2. Please link only new and current post, related to the current bake or theme provided by us. Unrelated post will be deleted.
3. Feel free to display our Bake-Along badge in your post.

****************************

 photo 77951578-1914-4b72-8eda-9e40a91183ac_zps331eb4b4.jpg


To join our blog hop, click on the link to get the codes
get the InLinkz code

Tuesday, March 18, 2014

Vindaloo

"March Potluck", time for our monthly potluck week at I Heart Cooking Clubs (IHCC).  And for this week, I'm cooking with Jamie Oliver, with my selected dish, Vindaloo.

A word of warning from Jamie Oliver on this dish "this is a hot curry and not for the faint-hearted, but you can always remove the chile."  Removing the chili is a no-no for me, vindaloo is supposed to be hot and sour! Just like Jamie says, this is a HOT CURRY, at least for the faint-hearted, not me, not me!  hehe! 


Jamie has given the option of using Patak's Vindaloo paste or make your own by using his Vindaloo paste recipe. I have opted to make my own, which is much cheaper and very easy to make. Whole spices are toasted and process to a powder. They are then processed in a food processor along with the rest of the paste ingredients until the paste is smooth. 

I have cooked about a kilogram of pork meat, and have increased all the spices in the recipes by half. The recipe is meant to cook about 800gm of meat. And go easy on the balsamic vinegar, start with a lesser amount first. I 've used about 1/4 cup of balsamic vinegar in total and the sourness is just right. From the recipe, the pork and the vindaloo paste are to be added to the pot at the same time, so I have marinated the pork meat with the vindaloo paste and keep in the refrigerator for about half an hour, then proceed with the instructions in the recipe.


I've used the amount of water stated in the recipe, which is 1-2/3 cups and there's no need for additional water at all during the braising, keep checking and stirring often to prevent the vindaloo from sticking to the pot. By the time the dish is done, the vindaloo has a fair amount of lovely thick gravy. 


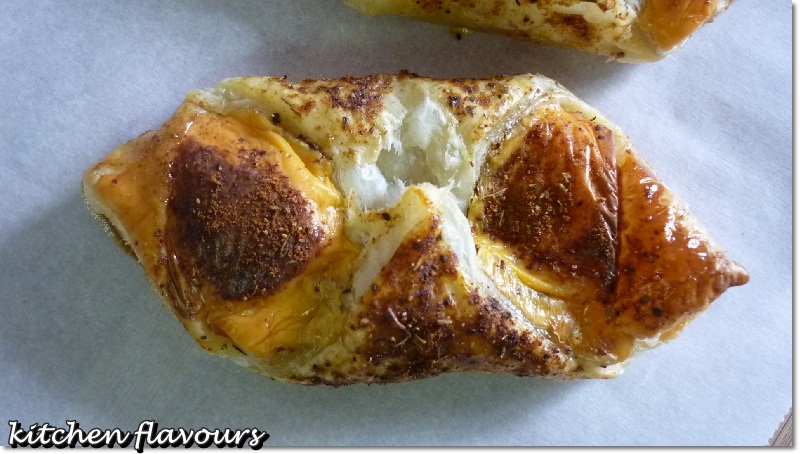
We ate this with jasmine rice. How does the family rate? This is too spicy for hubby, he was sweating while eating the Pork Vindaloo with rice! And my son, he loves it, even though it is too hot for him too. He insists on eating this dish, with a big glass of water next to his plate. The daughter, tried a piece, as she was recovering from a cough. As for me, well, it is quite delicious, and since I'm a person who can take a fair amount of heat, this dish is not all that spicy, but moderately so. The spiciness comes mostly from the black pepper and the chillies, though I can feel that mostly the heat is from the black pepper. For a milder taste, reduce the amount for these two ingredients. There was some leftovers, and the next day, in spite of the spiciness, both son and hubby ask for it again! And it tastes much better the next day, as with most curries.

Update on our current weather, it rained heavily two days ago, and again yesterday! Which was a relief to everyone! The haze has significantly reduced and the weather is a little cooler. I got soaked when fetching my daughter yesterday, from the heavy downpour, but I don't mind! Let it rain! Much as we welcome the rain, most importantly, hopefully it rained at the water catchment areas and over at the dams, as the water level has reached a critical stage, and we are experiencing water rationing at the moment. Like today, in my area, we have dry taps which will last until tomorrow. No cooking or baking! :o(


Vindaloo
(adapted from "Jamie's Food Revolution", Jamie Oliver)
Serves 4-6
2 medium onions
4 cloves of garlic
1-2 fresh red or green chillies, to your taste
a thumb-sized piece of fresh root ginger
a small bunch of fresh cilantro
4 ripe tomatoes
peanut or vegetable oil
a pat of butter
1-3/4 pounds diced pork shoulder, preferably free-range or organic
1/2 cup vindaloo or hot curry paste, such as Patak's or my vindaloo paste (refer below*)
sea salt and freshly ground black pepper
1/3 cup balsamic vinegar (I used 1/4 cup)
1 tablespoon honey
1 cup natural yoghurt (for serving)
1 lemon (for serving)

To prepare your curry
Peel, halve, and finely slice your onions. Peel and finely slice the garlic. Finely slice the chile. Peel and finely slice the ginger. Pick the cilantro leaves and finely chop the stalks. Cut the tomatoes into quarters

To cook your curry
Get a large casserole-type pan on a medium to high heat and add a couple of lugs of peanut oil and the butter. Add the onions, garlic, chile, ginger, and cilantro stalks and cook for 10 minutes, until softened and golden. Add the pork and the curry paste. Stir well to coat everything with the paste and season with salt and pepper. Add the tomatoes, balsamic vinegar, honey and about 1-2/3 cups of water; enough to cover everything, and stir again. Bring to a boil, then turn the heat down and simmer for 45 minutes with the lid on. Check the curry regularly to make sure it's not sticking to the pan, and add extra water if necessary. Only when the meat is tender and cooked, taste and season with salt and pepper - please season carefully. (Already spicy, there's no need to season with more pepper!)

To serve your curry
Serve with fluffy rice and with a few spoonfuls of natural yoghurt dolloped on top. Sprinkle over the cilantro leaves and serve with lemon wedges for squeezing over.


Vindaloo Paste
(adapted from "Jamie's Food Revolution", Jamie Oliver)
2 cloves garlic
a thumb-sized piece of fresh root ginger
4 dried red chillies
1 tablespoon turmeric
1/2 teaspoon sea salt
3 tablespoons peanut oil
2 tablespoons tomato paste
2 fresh red or green chillies
a small bunch of fresh cilantro

Spices for roasting :
1 teaspoon black peppercorns
4 whole cloves
2 teaspoons coriander seeds
2 teaspoons fennel seeds
1 teaspoon fenugreek seeds

To make the vindaloo paste :
First peel the garlic and ginger. Put a frying pan on a medium to high heat and add the spices for toasting to the dry pan. Lightly toast them for a few minutes until golden brown and smelling delicious, then remove the pan from the heat. Add the toasted spices to a pestle and mortar and grind until fine, or put them into a food processor and whiz to a powder. Either way, when you've ground them, whiz the toasted spices in a food processor with the rest of the ingredients until you have a smooth paste.

****************************

To view the potluck dishes that everyone has made, do visit I Heart Cooking Clubs (IHCC).
IHCC Potluck Badge


****************************

I'm linking this post to Cook Like A Star, All-Stars Anniversary Party, hosted by Zoe of Bake For Happy KidsMich of Piece of Cake and Joyce of Kitchen Flavours.
(click on any of the hostess blog for further info and to link your posts)

All-Stars Anniversary Party featured chefs :  Ina Garten, Jamie Oliver, Nigella Lawson, Curtis Stone, Ree Drummond, Bill Granger, Masterchefs, Martha Stewart, Delia Smith, Donna Hay


See you at the Party!
From 1st March to 30th April!

****************************

 photo 77951578-1914-4b72-8eda-9e40a91183ac_zps331eb4b4.jpg


Sunday, March 16, 2014

Crispy Honey Mustard Bacon Salad

"Eating of the Green", our theme for this week at I Heart Cooking Clubs (IHCC), where we are cooking from Donna Hay's recipes. This week is all about greens and I've made this easy and fuss-free salad, which takes just minutes to prepare! 

Recipe calls for arugula leaves, which I've replaced with butterhead letttuce, as I could not find any arugula leaves from the supermarket near my house. I've got to make a trip to another supermarket that sells arugula leaves, and I am really lazy as the weather is blazing hot, not to mention the terrrible haze which is everywhere! My children are keeping their fingers crossed, hoping that there will be an announcement that schools are to be closed for a couple of days until the haze condition improves!! 

Instead of baking the bacon in the oven until crisp and golden, I have pan-fried the bacon in a dry saucepan over the stove, which is easy and takes only minutes. And did not use fresh parsley, did not have any. Since I have an opened jar of store-bought honey mustard in my fridge, I used that to which I've added a tablespoon of honey and a tablespoon of water to thin it a little.


Just before serving, toss the cherry tomatoes, lettuce and cannellini beans with some of the mustard dressing. Scatter the crumbled crispy bacon over the top and drizzle with more of the mustard dressing. We had this salad with some baked chicken drumsticks.


Crispy Honey Mustard Bacon Salad
(source from donnahay.com)
4 rashers (220gm) bacon, rind removed
250gm cherry tomatoes, halved
400gm can white (cannellini) beans, drained
1/4 cup chopped flat-leaf parsley leaves
80gm baby rocket (arugula) leaves (I replaced with butterhead lettuce)

Honey mustard dressing :
2 tablespoons Dijon mustard
1 tablespoon honey
1 tablespoon water

To make the honey mustard dressing, place the mustard, honey and water in a bowl and stir to combine. Set aside.

Place bacon on a baking tray and cook under a pre-heated hot grill for 5-8 minutes or until golden and crispy. Drain on absorbent paper and break into pieces. Place bacon, tomatoes, beans, parsley, rocket and half the honey mustard dressing in a bowl and toss to combine. Divide between plates and serve with the remaining dressing on the side. Serves 2.


To view what my friends at I Heart Cooking Clubs are making, please do stop by IHCC.
IHCC Donna Hay Badge resized

Our time with Donna Hay is coming to an end soon, and we shall be cooking with another selected chef, Nigel Slater, starting from April. Anyone interested to join us, please visit this page at IHCC.


***************************

I'm linking this post to Cook Like A Star, All-Stars Anniversary Party, hosted by Zoe of Bake For Happy KidsMich of Piece of Cake and Joyce of Kitchen Flavours.
(click on any of the hostess blog for further info and to link your posts)

All-Stars Anniversary Party featured chefs :  Ina Garten, Jamie Oliver, Nigella Lawson, Curtis Stone, Ree Drummond, Bill Granger, Masterchefs, Martha Stewart, Delia Smith, Donna Hay

Thursday, March 13, 2014

Passion Fruit Granita

With our current hot and dry weather right now, a cool refreshing dessert would be most welcome anytime of the day. I was looking for something cold, yet light and refreshing to serve to the family as an after-dinner dessert. And this Passion Fruit Granita is just the one. 

The original recipe, taken from "Relaxed Cooking With Curtis Stone", is actually called Exotic Fruit Salad with Passion Fruit Granita, where the granita is served on top of a mixture of  starfruit, papaya, mango, kiwi and pineapple. I have however served the granita on its own.


Granita are pretty easy to make. Basically it is a mixture of fruit puree, sugar and water. Firstly, the sugar syrup is prepared, leave to cool and mix with the fruit puree to combine. This mixture is then poured into a baking pan, preferably metal, left to freeze in the freezer until the mixture is icy all around the edges. Using a fork, scrape the ice at the sides towards the centre, level it and freeze again, Repeat a few more times, until the granita turns into flaky crystals. 


I've added in about 2-3 tablespoons of honey when I mixed the syrup with the passionfruit pulp. It took mine a longer time to form ice all around the edges, and had to leave it frozen overnight in the freezer, still in the pan. The next day, I use the fork to scrape the icy sides toward the centre, which surprisingly, still with patches of liquid in the centre, even after leaving it overnight in the freezer. I did that about 3 times with a couple of hours in between. By evening, the granita is ready.


Very nice flaky icy crystals with the lovely fragrance and golden yellow colour from the passion fruit. This is good! Refreshing, light and so yummy!


Passion Fruit Granita
(adapted from "Relaxed Cooking With Curtis Stone", Curtis Stone)
1/4 cup sugar
1 pound ripe passion fruit, halved
1 tablespoon fresh lemon juice
2-3 tbsp honey (my addition)

In a small heavy saucepan, stir 1 cup water and the sugar together over medium-low heat until the sugar dissolves. Slowly bring the syrup to a boil; then remove it from the heat and let it cool completely.

Spoon the passion fruit flesh into the cooled syrup and mix together. Stir in the lemon juice. Pour the passion fruit mixture into an 8-inch square baking dish and freeze it for about 30 minutes, or until the mixture is icy around the edges.

Using a large fork, stir the icy parts of the passion fruit mixture into the remaining mixture in the dish. Continue to freeze the mixture, stirring the edges into the center every 20 to 30 minutes, for about 1-1/2 hours longer; or until it is frozen. Using a large fork, scrape the frozen granita into flaky crystals. Cover and keep frozen.


I'm linking this post to Cook Like A Star, All-Stars Anniversary Party, hosted by Zoe of Bake For Happy KidsMich of Piece of Cake and Joyce of Kitchen Flavours.
(click on any of the hostess blog for further info and to link your posts)

All-Stars Anniversary Party featured chefs :  Ina Garten, Jamie Oliver, Nigella Lawson, Curtis Stone, Ree Drummond, Bill Granger, Masterchefs, Martha Stewart, Delia Smith, Donna Hay